Friday, December 16, 2011

Wrapper and Cap Photos

So here are a couple of shots from my Christmas brunch yesterday.  I did dress up, and I'm really glad I did.  It was so much fun!


Thursday, December 15, 2011

Morning Cap Godey's Lady's Book 1861

     This is my new morning cap, copied from the August 1861 issue of Godey's Ladies Book.  It is made of white batiste, the finest lace I could find (which still isn't comperable to the laces of the 19C), and blue velvet ribbon.  I followed the advice of the Sewing Academy and pleated the edges rather than gathering them and then whipped the pleats together.  The base pattern was adapted from Butterick 5663.

     Caps in the 19C were quite the accessory for the fashionable lady.  Some were worn as dress caps by married ladies, out of the house to dinner, dancing, the theatre etc.  Some, like this one, were worn around the house in the morning prior to fixing one's hair for the day.  These were usually worn in combination with a wrapper and were sometimes called breakfast caps as they made frequent appearances at that meal.  Keep watching the blog for pictures of  me dressed in my wrapper and caps.  I hope to dress up in them today for my quilting Christmas party.

     I thought I would update you all, as I realize I didn't include the information in the last post.  For the parasol, I plan to recover it as closely to the original as possible.  This will be a functional living history item for myself, and I want to maintain the accuracy of the parasol.  I am currently on the hunt for black silk taffeta as my local fabric shop doesn't have any.  Whatever happened to black being a wardrobe basic?  I'll probably have to resort to ordering a 1/2 yd online - oh brother.

Tuesday, December 13, 2011

It's Here!

My parasol was delivered last Wednesday and I'm still super excited about it.  When I opened the package I was very surprised at how tiny it is.  It would very nearly fit inside a standard shoe box, the canopy itself is about the size of a large platter (18" - 19" in diameter).  This is the cutest thing.  The ribs are completely intact, one is slightly bent, but should be easy to straighten out.  The fabric is completely shot and deteriorating quickly, but I think I have enough to create a pattern for a new cover.


This is a Marquis parasol dating from the early 1860's and is a very typical representation.  A Marquis parasol, from what I have learned recently, is a very distinct style of parasol.  They were almost exclusively manufactured mid 19c. and in the United States, with steel ribs and a wooden shaft with varying shapes for the finial and handle.  The covering itself was always black, though not indicative of mourning, and could have up to three ruffles.  Black was used for these parasols as brightly colored silks were hard to come by during the war and were quite expensive.  A parasol was almost a necessity in a fashionable lady's wardrobe of the time as bonnets were getting smaller and some protection was needed from the sun.  The Marquis style was easy to come by as it was sold in local department stores for sometimes as little as a dollar.  These parasols were definitely a functional, but fashionable accessory.  I would venture a guess (this could get me into trouble I know) that most women and older girls had one unless they were quite poor, or for reasons of locale such as remote farm wife etc.  Again I will stress the word fashionable; if they could, or wanted to keep up with fashion, even in a slight way, where they had occasion to dress up in their best a parasol was a very likely accessory.

Tuesday, December 6, 2011

Parasol Frustration

Oh, the delays of the mail!  Why couldn't things just work out one day sooner?  I won this parasol on ebay last weekend for a whopping $20.  Yes, it looks sad, but the frame is intact so all I need is a bit of silk taffetta to make a new cover - easy enough.  However, the mail is against me getting my parasol.  The little elves that make the post office work have turned into parasol trolls and are probably all playing with it as it has made it's way from NJ.   It was processed through the Federal Way, WA sorting facility early this morning (I'm stalking the tracking system), but there is no way on earth that it can be delivered in Blaine today.  It's scheduled for delivery tomorrow!  Tomorrow doesn't work, we have to go across the border today!  Now I have to wait another whole week, while my new toy sits in a dark, cold, lonely office waiting for me.  (Sighs)

Tuesday, November 22, 2011

It Was A Dark and Stormy Night

I made it home from knit night last night at Black Sheep Yarns just before the storm hit.   The weather man had been foretelling throughout the day that this storm was coming, but like most people I can be a little sceptical of his actual foreknowledge.  He was very correct yesterday, right down to the approximate time the storm would hit - near midnight.
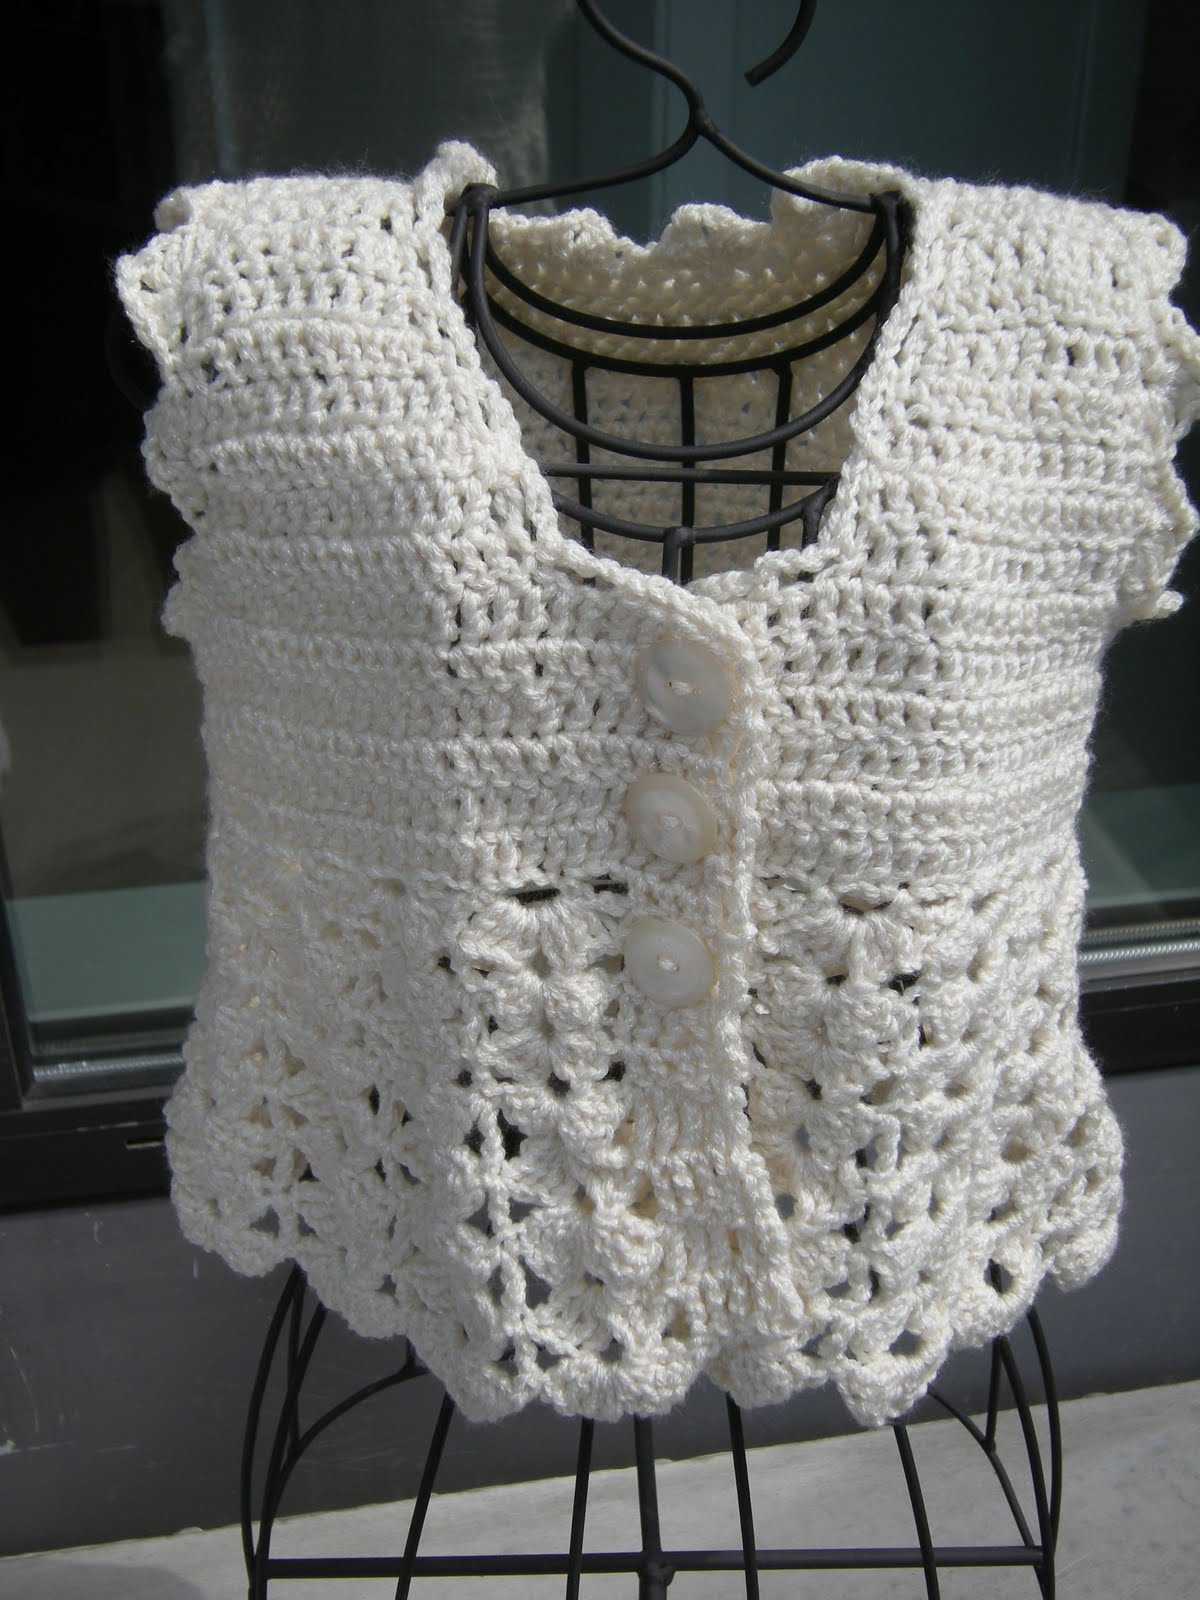
     I had just settled into my recliner, after starting a load of laundry and starting the dishwasher, to work a little more of the hat I had begun at knit night.  [It's the Bramble Beret from Vintage Modern Knits]  I was having a bit of trouble getting the gauge right for the band so that the hat would fit correctly, but after changing needle sizes and knitting a few rounds I was able to try it on.  It fit great.  The pattern calls for the band to be knit on sz 5 (3.75mm ) needles, but after looking at the band, I could tell it would be just too small so I went up to sz 6 (4 mm) and bingo.
    Suddenly, the doors on our fireplace began to rattle and I heard a suspicious tapping on our front window.  Sophie's ears were perked up and she was starting to growl.  As I sat, nice and warm and cozy with some ohh so soft yarn in my lap, I could hear the wind and the rain begin to pick up.  It absolutely howled down the chimney and under the eaves, sounding nearly like a freight train.  (If you've never been in Vancouver for one of our windstorms they are certainly an event.)  The wind and rain continued through the night making sleep a much desired commodity.  Hubby went to sleep downstairs on the couch, and Sophie soon followed him.  At one point, I had to make a dash into the front yard to rescue two small climbing roses from  an arbor that the wind decided was ill placed.
    This morning I awoke to quiet.  The rain and wind had all but stopped and it looked like the clouds were beginning to lift.  Taking a look around the yard, tarps are blown off objects they were meant to protect, the canopy of my swing was lifted and set back askew, the garbage can was blown open and moved, and there is tree litter everywhere.  The forecast I'm hearing for today is for a bit more rain, but the sun is slated for a cameo appearance later tomorrow afternoon.  Maybe then I'll get out and clean up some of the wind's destruction.

Friday, November 11, 2011

Remembrance Day 11/11/11

I love the fact that Canada takes Remembrance Day so seriously.  For a week now, service men and women have been standing outside of many different stores and buildings selling red poppies to aid our veterans.  I can't help but recall the men and woman in my family that have fought, served, and continue to serve to establish, secure, and preserve the freedoms that I enjoy.

Abraham Ream, Pennsylvania Militia, Revolutionary War

John Cox, died at Cheat Mtn Virginia 1861 US CW
Joel Line Cox,  US CW
Jesse T. Cox, US CW
Joseph Cox, US CW

Burnette O. Bower "Pete", WWI

Gaylord "Jack" Ream, WWII
Lindley Cox, WWII

Don Ream, Vietnam Conflict Pacific
Marilyn Ream, Vietnam Conflict Pacific

Cpt Matthew Ream, USAF JAG

I'm calling my Veterans today, how about you?

Thursday, November 10, 2011

Circular Sock Knitting.

Recently I have been learning to knit socks on a CSM (circular sock knitting machine) that a friend of mine is refurbishing for the owner.  Circular sock knitting machines were originally manufactured in the late nineteenth century and continued to be produced up until the second world war.  Sock knitting became a cottage industry early in the twentieth century as women began turning out socks from home, with the machine being purchase by an "employer".  Some machines were purchased by a community and passed from house to house through the year as a housewife would produce socks for her family.  A friend of mine recalls a CSM at home when she was a child, and remembers the fun of turning the crank.  They are quite fun to use and almost magically produce socks, though I think I still prefer to knit them by hand.
 The guide feeds the yarn into the top of the carrier.  (At the bottom of the cylinder in the picture)  This carrier is moved counter clockwise around the cylinder by turning the crank.  As the yarn is carried around the cylinder, it is caught by tiny latch hook style needles that pull the yarn through each previous stitch creating a knit tube.  Each sock size is determined by 1) the size of the cylinder (60 sts, 80 sts etc - number of needles it will hold) and 2) the number of rounds between the heel and toe.  The heels and toes are shaped in a similar manner, by only knitting on half of the needles. When you are finished you end up with a long, funny shaped scarf, like this:

The yellow yarn is waste yarn that is used to start the sock, the white yarn to the left is the division between the first and second sock, and you can see a heel at the center top of the picture.  All that's left is to stitch down the top hem, and graft together the toe. (On my second pair of socks we were able to do the hem at the cuff in one step on the machine, eliminating the extra finishing step.)
My friend brought the knitting machine to knit night at our lys (local yarn shop) Black Sheep Yarns to let everyone see how a CSM worked.  (I had forgotten to take pictures to show you all while I was making my socks, so I sat and posed for a shot.)

Saturday, November 5, 2011

Sweater Weather

The temperature is definitely dropping here in BC.  We've had frost on the grass for a couple of mornings, and there is a definite chill in the air.  The beautiful leaves and sunshine are an added bonus this year.  All of this means I'm ready to start pulling out my sweaters.  There's only one problem with sweaters while living where we do.  It's usually too warm to keep them on all the time.  When we moved here from Nebraska, my winter wardrobe consisted of several really warm pullover style sweaters that I'd wear with turtlenecks, this was great in Nebraska.  Here, I was too warm.  I have had to modify my woolies significantly.  My sweaters now are much lighter affairs, sometimes blended with cotton, and usually cardigans that are easy to layer.  Here is my newest finished sweater,February Lady, she is just perfect for our BC winters, and I know she will see a lot of use.

Saturday, October 29, 2011

Godey's Images

I was just given a series of Godey's 1870 Fashion Plates from a friend.  She and her sister had ordered them through the McCall's pattern company as teenagers, I refrained from asking the year - she has grown children.  The Fahsion Plates recently resurfaced as she was cleaning and reorganizing, and she immediately thought of me, and that I would enjoy them.  I love them and have plans to purchase better frames, the ones they were in did a good job of protecting them, but they're falling apart.  Now I just need to decide where to hang them, my sewing room (short of wall space but I could make room), or my guest room (definitely history inspired but again a little short on wall space)?  I am leaning toward hanging them in the guest room as I am in there frequently, and then any guests could enjoy them as well.

Monday, October 24, 2011

Fall is in the Air


There is a definite chill to the air today, and the sun is trying to peek through scudding clouds.  I figured today was as good a day as any, and probably better than some since it's not raining, to get started on the clean up in the garden.  This is the first year that the weeding isn't overwhelming, and there just isn't a whole lot that needs doing right now.  I did a what little weeding there was in the front, trimmed back the lavender that I forgot about during the summer, and cut back the peonies.  Then I had a few plants that needed transplanting, and a bit of yard waste to clean up and that was all.  I thought I would post a picture of what I found blooming in my garden today.  It's a hardy cylamen, it blooms in the fall and has beautiful heart shaped leaves through the summer.  I was afraid that I had somehow inadvertently damaged the bulb before I got it planted, but everything is just fine.  I can see a couple more sprouts just peeking from the soil.  The bloom is tiny, only about the size of a nickle, but so pretty.

Tuesday, October 18, 2011

Ladies Wrappers

Here is my finished 1860's wrapper, made from the Kay Fig Ladies Wrapper pattern.  Wrappers were quite a utilitarian garment in the 19th century, more so than our bathrobes today.  Some were really only meant to be worn in the bedroom, some as a robe itself over a nightdress,  but many more were designed as more of a housedress.  They could be worn in the mornings, where the name morning dress comes from, to breakfast and around the house prior to making or receiving calls later in the afternoon.  The back and bodice lining are fitted just like a dress of the period with only the front panel being lose and full, many times tied in with a sash, belt, or cord.  They were worn over full underpinnings and could be left open to show off a prettily embroidered petticoat.  Because of their design they were also beneficial for invalids or as maternity wear.  As maternity wear, the full front panel becomes much more useful as it would expand with the growing baby, only the lining would have to be altered or left partially unfastened.
     Many different fabrics were used for wrappers in the 19th century.  Godeys and Petersons magazines show fashion plates with wrappers made of silks and satins and trimmed in lace.  However, the most common were those made of a calico or soft wool, usually with wildly contrasting front panels, facings, and hem treatments.  Several wrappers shown in the pattern were even lined with multiple cotton prints.  When used for maternity wear, many looked very similar to the fashion dresses of the time.  I certainly love my wrapper and it has already seen quite a bit of use around the house.
     I loved working with the Kay Fig pattern as the instructions were very clear and easy to follow.  The extra bits of history and photos of original garments were a plus as well.  I will definitely use her patterns again as needed.

Friday, October 14, 2011

Needlebooks

I thought I would post a bit about Needlebooks as I now have a really cute one to share.  Needlebooks, were and still are, a useful way to keep your needles handy without losing them to the floor, or the interior space of a pincushion.  Historic needlebooks of the mid 19th century came in various sizes and shapes, some with embroidery, silk ribbons, beads etc. on the cover.  There were needlebooks shaped like fish, sea shells, bellows, bells, shoes, bows, fruit, and almost anything you could concieve of.  Some were shaped more like a traditional book decorated with ribbons.  Inside the cover were leaves of wool to store the needles in.  Wool was used as it wouldn't dull the tips and it would inhibit rusting.  Some came with spaces to store a bodkin and or a stilleto, some with room for a small pair of scissors or loop for a thimble.


These first two are pictures of a needlebook that I received in a swap with a historic sewing group.  Notice the shape of a shoe and how the thimble fits nicely into the top of the shoe.  The sole of the shoe (or the bottom of the needlebook) also acts as a pin book.  It is made with two pieces of pasteboard covered with fabric and sewn together around the outer edge with a bit of wool batting inside to cushion and protect the pins.


This next one is similar to the one that I sent out for the needlebook swap.  It is made of cream colored wool with a black velvet band on the front and back cover. The little sachet on the front is silk stuffed with wool batting to act as a bit of a pin cushion while you're working.   This one is taken from an antique in the collection of Anna Worden Bauersmith. 

I am really finding these little books quite handy, and plan to keep one in most of my work spaces.  Perhaps then I'll keep from losing the needles.

Tuesday, September 27, 2011

Ladies Chemise and Laundry Markings


I finished my new chemise and finally got around to also adding the laundry markings.  This chemise was drafted from the directions on the Sewing Academy website (also available in the Dressmaker's Guide by Elizabeth Stuart Clark).   It's made out of bleached muslin and embroidered on the lower right hem.  This is by far the most comfortable of the three chemises I have - the others have fitting issues in the sleeves and around the neckline.  I find that these make the most wonderful nighties, and have plans to make atleast one more from Simplicity 2890.

Laundry Markings were used as a way to differentiate one woman's laundry from another when being washed.  This was an issue historically as undergarments were all white and the general styles varied very little from each other.  They were usually worked in tiny cross stitches in either red or black in an inconspicuous spot.  If a lady was part of a gentleman's household then her first initial was preceeded by his first initial and then followed by the first initial of the family name.  So my laundry marking is Jonathan Angela Oehlert.  Then would follow details of the fabric, such as Bleached Muslin, then perhaps the number of the garment (if you numbered your household linen), and finally the year as shown above.   It wasn't difficult to work and I quite the looks of my marked laundry.

Saturday, September 24, 2011

Confederate Enlisted Frock Coat

Whew!  I'm not sure what is wrong with Blogger this morning, but it has taken me nearly an hour to upload these two photos.  Everything else on the computer seems to be just fine, the only problem is my connection with Blogger.  Go figure.

So, here is the Confederate Enlisted Frock Coat that I finished for my brother last month.  I am so pleased with how it came out, and more in how it fits.  Ben loves it, and has planned to do the topstitching and buttonholes himself.  It is made of a gray/tan jean wool with navy wool collar and cuffs.  Lined with cotton and wool breast pads (shown in the bottom photo).  Now that I have successfully finished Ben's I may be a little more inclined to tackle a Civilian Frock for hubby.  However, I must complete pants, shirt, vest, and drawers first.

Thursday, September 1, 2011

Summer project pictures

I finally sent the baby gifts through the mail to my sister and her girls, so now it's safe to show you all the pictures of what I have been working on.


The first two are for Elaine, a cotton sun hat and cotton top.  I just love both of them and she's going to look absolutely darling!


These last little goodies are for new baby Tessa.  I hope she's able to wear them all and that Mommy enjoys them!  I certainly had fun knitting for two very special little girls.

More to come later of the summer projects that are now all finished.

Monday, August 22, 2011

I hate to say this....

but, it's raining and I love it!  After a terrible, horrible, no good, very bad spring, we made it to summer by the middle of  July.  Everyone, was lamenting the cool weather and the excessive rain.  The gardens wouldn't grow, and you could feel the depression all over town.  When the dry, slightly warmer weather finally arrived, people left their homes in droves to go camping, hiking, to the beach, and to the garden centers.  (I'm relatively sure the local garden shops were afraid they would never do any business this year.)  We have had four weeks of some incredibly beautiful weather - perfect for anything you wanted to do outside, and the gardens have made up for their late start, sort of.  But, along with this beautiful weather has come no rain, and on Saturday the heat hit.  Now I can make up for no rain, and I did, by watering regularly.  However, I cannot do anything about the heat and it makes me very cranky, and Saturday was hot (ok, so it was like 82, but when you're not used to heat anymore and no place is airconditioned.....), and Saturday night was worse, and Sunday almost as bad.  By Sunday night "irritable" was a mild adjective.  Then Sunday night was hot....I won't go there.  I awoke this morning to the sound of water dripping from the gutters.  I should have gotten up, however, my swimming schedule had been rearranged (thank you very much J.J. I needed the sleep too.)so I rolled over and went back to sleep.  Several hours later we still have a very nice steady rain and it's back to about 68 degrees.  I am contemplating a nap.

Wednesday, August 17, 2011

Summertime Fun

We have been quite busy the past few weeks with wonderful summertime activities.  I'll be adding a couple of other posts as I get pictures back from hubby.

      Last weekend I persuaded J to take me south to Ft. Nisqually, just outside of Tacoma, WA.  There are quite a few gals that interpret there that I have met online on a historic sewing forum called The Sewing Academy.  I am looking for a place/places out here to get involved with costuming and living history as US CW is not quite as popular this far west.   Pretty much my only option thus far is Husdson Bay Fur Trade stuff - not quite as much fun for me to dress up.  Ft. Nisqually offers what seems to be a happy medium.  The original occupants of the fort in 1858 had had quite a bit of English/French influence so the clothing is a little more what I am looking for.  The factor at the fort was a Scottsman, William Fraser Tolmie and his wife was Jane Work, the daughter of  John Work, an Irish fur trader and Josette Legacee, a Metis woman.  Jane had adopted more of the European lifestyle, likely due to her heritage and schooling.   This is opposite of what was going on at Ft. Langley, another Hudson's Bay Fort, at the same time (further blog post will follow).
     Fort Nisqually is staffed with some wonderful volunteers, many of whom are exceptionally knowledgeable about the Fort and the dress of the time.  They rotate years from 1855, 1857, and 1859.  Those representing life at the Fort are dressed in the normal English dress of the time and do a wonderful job of interpreting the people who lived and worked at the Fort.


This is Victoria Pann, portraying Jane Work Tolmie, I think.  (That or her sister Lettitia)


This is one of the first food processors in the kitchen at Ft. Nisqually.  There is a blade in the bowl that moves up and down to chop the food as the handle is turned.


This is one of the visiting Fur Brigade.  He does all of his own blacksmithing, woodworking, and rifle making.  Truly incredible work.


Friday, July 29, 2011

Whew!!!

I have been madly knitting and sewing for the past two weeks getting some surprises ready for my new neice.  I can't post pictures here yet as her Mommy does look in occasionally and I want her to be surprised too.  I can see the light at the end of tunnel now and am excited to pop the items in the mail.  I also need to finish off my brother's frock coat - still in pieces, and I would like to have some semblance of a kit for my husband for a reenactment in three weeks.   I can't think about this all at once or I will get overwhelmed and never get finished.  I do appreciate have lots of things to do to keep me out of trouble.

I hope all of you are enjoying your summer as I am.

Wednesday, July 20, 2011

New Dress

I am thrilled to finally be able to post some pictures of the dress I finished.  It has been a little while as I was waiting for photos from friends to get back to me.  Here is my pink sheer silk.  The ruching at the edge of the sleeves has hand-rolled hems and is hand gathered.  The bodice is gathered at the shoulders and waist.  Please excuse the bag, it was a last minute grab and certainly looks a little better than my modern purse.  The photos were taken at Van Dusen Gardens on June 23.

Saturday, June 11, 2011

How does your garden grow?

We are finally getting some bettter weather and the garden is starting to catch up.  Things that normally bloom in May are in full blossom now.   One of my lilac bushes is planted under my window, put there on purpose, and the scent of lilacs and sweet iris has been drifing into our bedroom at night.  Only sweet dreams can come from falling asleep kissed by a sweetly scented night breeze.  This has to be my favorite time of the year.  The roses are just starting to bloom, and the first peony opened today.  There is such a happy hum in the garden as the bees wander from blossom to blossom.  It brings to mind a poem I memorized in high school:

To make a prairie takes a clover and one bee,
one clover and a bee,
and revery,
Revery alone will do, if bees are few.      - Emily Dickinson

Here are a few shots of spring in my garden.


I appologize for the problems with the spinning video in the last post.  I didn't insert it correctly into the blog so you couldn't access it.  I have fixed the problem and you should be able to go back and watch it now.  Enjoy!

Friday, June 3, 2011

Spinning

I am still here and quite busy.  We've had a lot going on for a month or so, including a wonderful visit from family.  I have also picked up a new hobby.  Thanks to a wonderful friend, and enabler I have my own spinning wheel now and am learning to spin.  I started with a drop spindle last year:

A spindle works for creating yarn, but I find the process rather slow.  I have dreamed of owning a spinning wheel for quite a while and never really thought that I'd get one.  Enter wonderful friend who happened to find a wheel for me at a garage sale - and I wasn't really thinking of getting one at the time.  I picked it up on a Monday afternoon and took it with us as we went out of town.  It's a Lendrum wheel (made here in Canada) and she spins like a dream, she's been named Lizzy.  Here's a brief spinning demonstration that was done at my quilting group on a Thursday morning.


Saturday, April 30, 2011

My Favorite Dress.....

I know some of you have a favorite dress or item of clothing that, it seems, you wear all the time.  It fits better than anything else, it feels fabulous, and it's one of those items that looks great on you too.  All in all, it fits the description of a perfect piece of clothing, and we wish that all our clothing was just like the said item.  Like you, I have said dress.  It was a gift from my mom several years ago and it's perfect.   I knew it when I tried it on that first day.  There was some discussion as it was rather expensive, but my dad ( aren't dads the best) said don't worry about it!  I left the store that day with one of the few few perfect garments in my life.  This dress has seen quite a few years of duty and I'm relatively sure that it is coming to the end of its natural life.  With some TLC I'm sure I can make it last a little longer, but what will I do when it's gone?

I can only say, Thank you MOM  (aren't moms the best).  She taught me to sew many years ago, so I had the solution to the problem.  I would make another dress just like the one I have.  After several days spent in my sewing room with pencils, pattern paper, pins, and yards of lining I had it almost completed.  Now it was time to actually cut out the fabric that was waiting.  (It had actually been waiting in my stash for several years for a dress that I decided I really didn't like.)  When I had finished with the last bit of hand finishing and I tried on the dress, it was magical.  I knew it right away, I had succeeded.  This was perfect, the color the lines, the fit, the feel, oooohhh!  I did a little dance and spin, this was just in time for Easter Sunday.  I even had the perfect sweater waiting, made just for this dress.

Now that I have a pattern, I see many happy years ahead, and I am starting to envision ways that the pattern can be altered for new garments.  Happy sewing!

Thursday, April 28, 2011

Missing in Action....

I appologize for seeming to drop of the screen, but I am still here.  We have had quite the past few months and I just haven't felt able to post about it yet.  Shortly after the last post, hubby and I found out that we were pregnant, however, things did not go well.  About a month ago now, after an early ultrasound, we learned that there was no heartbeat.  I have since been in the hospital for a D&C and spending some time recuperating.  This, along with some other stresses has really cut me off this spring.  I am feeling better now, though there are many days where the grief is still overwhelming. 

Miscarriage is a very misunderstood death as most times there is no outward proof.  However, you still grieve for that child just as you would for anyone else and time is the only way to heal the wound.  One of the things that has helped me the most through the past few months, is being able to talk about it to friends and family.  Being able to vocalize the fear and pain allows you to grieve more effectively.  If you know of anyone who has lost a child, or another loved one, be available for them to talk to.  Many times, it's what they want, but are too afraid that no one else cares how they are feeling.  Grief is a process and doesn't end quickly, but the love of friends and family is definitely one of the keys to healing.

I will post again in a day or two and share with you some of the things that have helped to pass the time, as well as a new hobby I have picked up.

All the best

Angela

Thursday, February 17, 2011

Nightdress, Godeys 1861


I thought I'd share with you my most recent endeavor. I have decided to try recreating a nightdress from Godey's 1861 vol. 62. I am making this out of white flannel that I purchased at Joanns. This is not a correct fabric for midcentury, but it will suit my purposes perfectly. I have ripped out the two lengths for the body and drafted a yoke from the 1838 Workwoman's Guide Plate 8 Fig 7.


I am just about ready to start working on the sleeves.  I will also add some handmade lace trim along the placket.  For the lace, I have a couple of ideas from a midcentury publication that I'd like to try to knit.


Tuesday, February 8, 2011

Silk Sheer


I was able to do some sewing for a couple of little girls last month and with the payment I bought a length of rose colored sheer silk. I had planned to use the Peach Tree Mercantile pattern shown in the picture, but upon some guidance from the Sewing Academy realized it wouldn't be appropriate for the silk fabric. The Peach Tree dress was done in cotton and hence waist, shoulders, and sleeves are all gathered, a silk dress of the time would have been pleated and or darted. So, I have decided to base my dress off of a picture I have from a costume book. It is a diagram of an existing dress, done in silk with open sleeves and a pleated front bodice. I plan to use my existing fitted toile and alter that to the design from the book. I am preparing to start a pair of lace cotton knit undersleeves from Godey's 1855. These will be lovely under the open sleeves of the dress. I will share my progress with you as I begin work on the dress. First, I must finish my brother's frock coat.

Wednesday, January 26, 2011

This day in 1861

I thought I would share with you some excerpts of letters from my family that we have from the time of the Civil War. This is only meant to share with you all some of the thoughts and feelings of the people as they responded to what was going on around them. They were a family of 11 brothers and sisters, 3 boys and 8 girls, their father had died four years previous leaving his wife and two eldest sons to provide for the family. The eldest son John had been involved in starting up a mercantile in Bloomington, but has decided to sell out, thinking he will go to college and study law. Joel is the homebody content to tend the farm and raise sheep. The older girls, once they've finished their local schooling, move away from home, living with relatives and getting more education. They are a close family with many aunts, uncles, and cousins living in the area. In fact, two of their deceased father's brothers, twins, began to help the family after their father passed away.

This first letter is from John in Bloomington, Indiana just after he has sold out from the mercantile.

January 25, 1861

My Dear Brother Joel,

'I received your very welcome letter yesterday...I am sorry that you are a proslavery man but I am much more sorry that I have a brother who is a disunionist & if you are really in earnest in what you say in your letter you must be one. You say what has South Carolina done? Has she violated any laws of the U.S.? Yes sir she has. You surely have not posted yourself on your own side or you would not ask such a question. She has rebelled against the U.S. & declared herself out of the Union. She has refused to pay postal money due U.S. She fired upon the Star of the West that had the Stars & Stripes floating & was a ship belonging to the U.S. of itself sufficient cause to justify Old Buch in sending down an army strong enough to bring her back to her duty...Tell Martha and Mary [The two oldest girls] and Mother that they all owe me a letter and that I would be glad if they would write soon...Write soon and believe me as ever
Your Bro. J.C. Cox'

This excerpt was transcribed exactly as John wrote it so sentence structure etc. is his.

Sunday, January 23, 2011

Civil War Quilts QAL

Texas Tears - Remembering Sam Houston, Governor of Texas and supporter of the Union


Catch Me If You Can - a block to remember the slaves that made the attempt to gain their freedom.


North Star - a block remembering the abolitionists that stood against slavery.


I've joined a Quilt Along (QAL) for the Civil War Sequicentennial with Barbara Brackman, Civil War Quilt Historian, author, and fabric designer. The name of the blog is Civil War Quilts. ( I want to add her button to my blog but haven't figured out how yet. If any of you can help me let me know.) Each week she shares an eight inch block pattern that represents a point in, or some history of the Civil War, or an actual block used at the time. At the end of the year we all should have completed fifty-two blocks that can be combined into a quilt. I just learned about this through a quilter in my little quilting bee this week and decided to take the challenge. I've started all four blocks and have finished three of them. The applique block will take a little longer as it has to be finished by hand, so it is "sitting" for now. Each of my blocks will be made from accurate CW reproduction fabric. Above are the three completed blocks.


Wednesday, January 19, 2011

Confederate Enlisted Frock Coat - lining


Sorry to my faithful readers, I have not been doing a whole lot on the computer lately due to much sewing and other duties. I finally finished the birthday presents for my nephews on the embroider machine - a whole nother story, a pair of culottes for a little girl at church, and got my brother's Frock lining ready to mail to him for a fitting.


I am using the Galla Rock Confederate Enlisted Frock Coat pattern that he chose. He was going to attempt to make it himself, but ran into fitting issues with it so chickened out. He had actually just cut out the wrong size, so I am fixing it for him. So far so good, though I haven't really done much. I am having a bit of trouble fitting the sleeves into the armscyes. There are no notches or marks to line anything up with, so where exactly does the sleeve seam line up on the front of the coat? This leads into how much ease will there be in the upper sleeve and the lower sleeve? So far, I've just basted the sleeves in for him to try them on and there are quite a few puckers. I'm a little concerned about actually stitiching them in.


Thought I'd let you know, since I haven't been here for a few days, that yes I did the tatting on my drawers myself. What an adventure. I do plan on doing some more of it, possibly on a new upcoming chemise, but it took quite a bit of fiddling. I used sz 100 tatting thread and a very fine tatting needle and just a basic picot lace edging. I do hope to get a book of period tatting patterns very soon.


Best of the day to you all, and happy sewing.

Saturday, January 1, 2011

Tucked and Tatted Drawers


So here are my finshed drawers. I am so pleased with how they came out, though I am not wild about the fabrick they are done in. They were drafted to my measurements and cut out. I used a tightly woven muslin/cotton sheeting. They are quite sturdy which is historically accurate, but they aren't as soft as I would have liked. I really had trouble finding just the perfect muslin for these. They aren't uncomfortable by any means, but a little stiff and "rustly", this is the perfect fabric for tucked petticoats. (Pictures in a later post) I added free style waves of feather stitching between the tucks and a fine tatted edging with sz 100 tatting thread.
Drawers in the mid 19th century were meant as a serviceable garment, and didn't gain the lace and fancy stuff until later in the 1800's. Laundry was still quite a rough task and laces and flimsy fabrics just wouldn't have held up to the boiling, scrubbing, and soaps that were used. Our foremothers had a good dose of healthy economy and would not have added anything that would have just fallen apart after a washing or two. For those particular females that wanted a little feminine touch, white embroidery and tatting in cotton threads were the common and logical choice.